

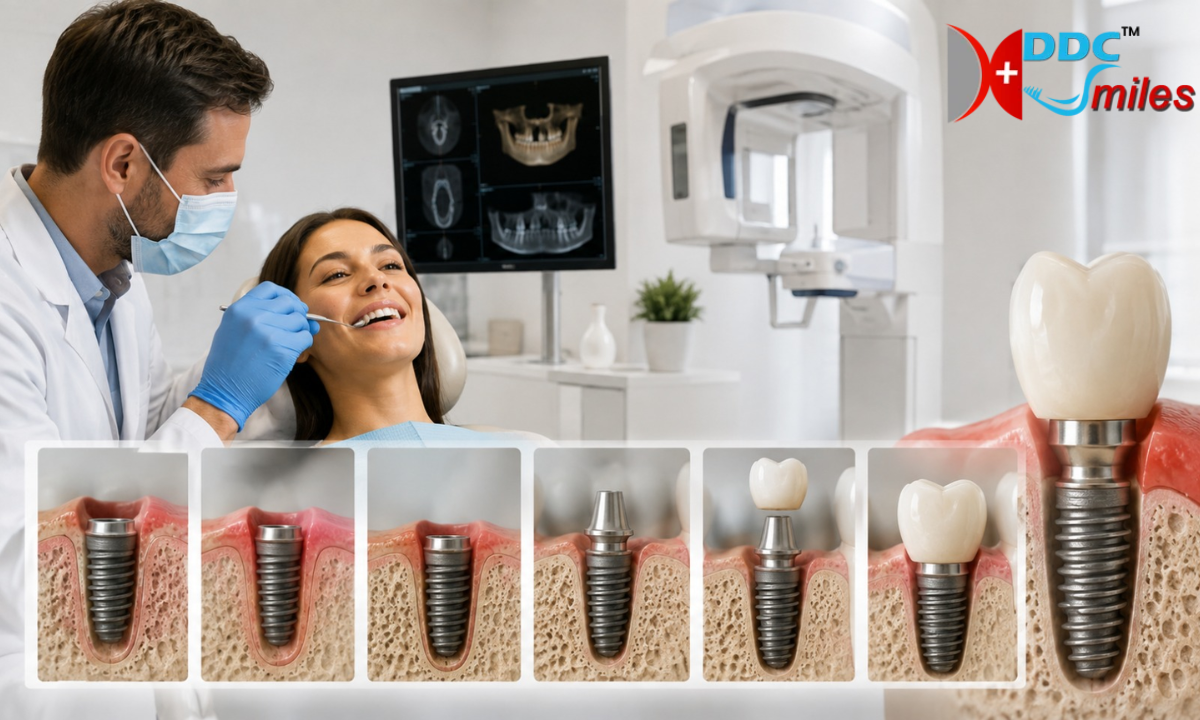
Understanding the dental implant recovery timeline is essential for anyone seeking to restore missing teeth with permanent, natural-looking confidence.
Whether you are exploring options for Dental implants in HSR Layout and Koramangala, preparing for surgery, knowing what to expect during each recovery phase eliminates anxiety and sets realistic expectations. Unlike temporary removable dentures, dental implants fuse biologically with your jawbone, making healing a predictable, multi-stage journey toward full chewing function and aesthetic renewal.
A dental implant is not just an artificial tooth; it functions as a bionic tooth root fabricated from biocompatible medical-grade titanium or zirconia. Because the fixture integrates directly with living alveolar bone, recovery unfolds in two parallel dimensions:
1. Superficial Soft-Tissue Healing: The gum tissue seals around the surgical collar within the first one to two weeks, protecting the underlying site from oral bacteria and food debris.
2. Deep Osseointegration: Microscopic bone cells (osteoblasts) attach to and grow into the micro-textured implant surface over three to six months, creating a rock-solid foundation capable of withstanding natural biting forces.
Modern computer-guided surgical planning utilizing high-resolution 3D Cone Beam Computed Tomography (CBCT) drastically reduces tissue trauma, surgical duration, and post-operative swelling. Knowing the biological milestones of each week allows patients to protect their investment and return to daily life with confidence.
What You Will Discover in This Guide
1. Week 1: Managing the critical first 72 hours, clot stabilization, and soft-food nutrition.
2. Weeks 2 to 6: Suture care, gum maturation, and sub-gingival healing.
3. Months 2 to 6: The biology of osseointegration and what ensures long-term structural success.
4. Beyond Month 6: Custom abutment placement, permanent crown loading, and peri-implant maintenance.
Clinical Guidance at DDC Smiles: Guided by Dr. H. J. Jaikrishna, Maxillofacial Radiologist (FDS RCPS Glasgow) DDC Smiles utilizes in-house 3D CBCT diagnostics and computer-guided implantology across Koramangala and HSR Layout to ensure precise fixture placement, minimal surgical trauma, and smooth post-operative healing.
Medical Disclaimer
The surgical timelines, recovery guidelines, and clinical descriptions provided in this article are intended strictly for educational and informational purposes. This content does not substitute for a formal clinical diagnosis, individualized surgical planning, or personalized medical advice. Healing times and bone integration rates vary depending on individual bone density, systemic health, and lifestyle factors. Always consult a qualified dental specialist or maxillofacial surgeon for an in-person clinical and radiographic examination before undergoing any dental procedure.
Week 1: Initial Healing, Clot Formation & Soft Tissue Care
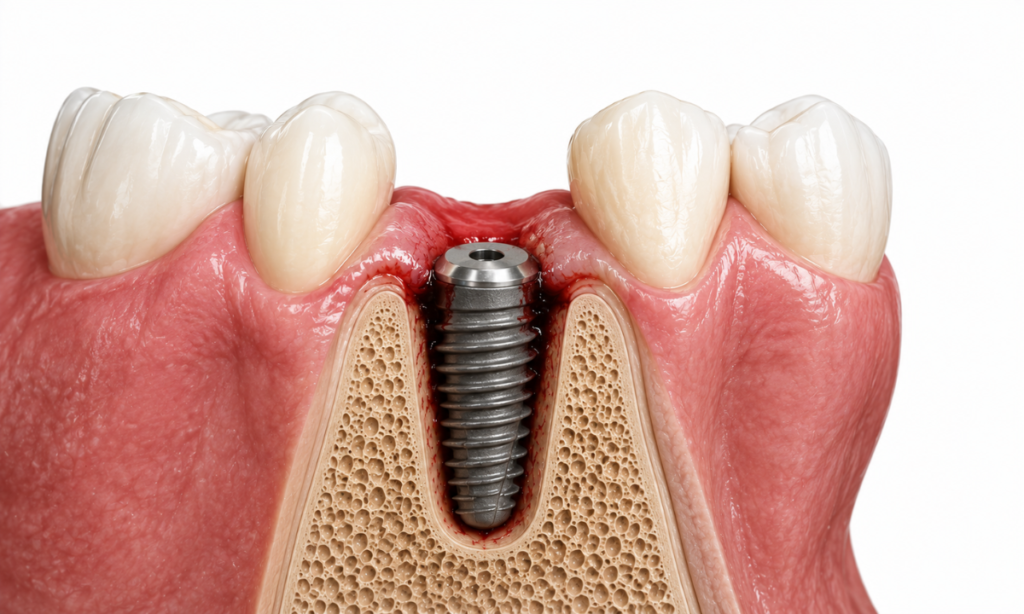
The first seven days following implant placement form the biological foundation for long-term clinical success. Immediately after dental implant surgery, the body initiates an acute inflammatory response to seal the surgical wound, stabilize the primary blood clot, and begin repairing gingival tissue around the titanium fixture. Adhering to structured post-operative protocols during this initial week prevents localized infection and shields the healing site from mechanical trauma.
The First 72 Hours: Protecting the Blood Clot & Minimizing Swelling
The primary objective during the first 48 to 72 hours is preserving the stable blood clot formed over the surgical site:
1. Bite Pressure & Clot Formation: Keep the sterile gauze pack firmly in place for 45 to 60 minutes immediately following surgery to encourage primary hemostasis. Minor blood-tinged saliva is completely normal during the first 24 hours.
2. Zero Suction Forces: Avoid spitting, drinking through straws, smoking, or forceful mouth rinsing for the first 24 hours. Intraoral negative pressure can dislodge the fragile fibrin clot, delaying soft-tissue closure.
3. Cold Compress Therapy: Facial swelling and mild bruising typically peak around 48 hours. Apply ice packs wrapped in a clean cloth to the cheek in 15-minute intervals (15 minutes on, 15 minutes off) during the first two days to restrict capillary leakage and reduce swelling.
4. Head Elevation During Rest: Sleep with your head elevated on two pillows for the first three nights. Keeping the head above heart level reduces localized blood pressure and limits morning facial puffiness.
Week 1 Implant Care Tips
Protecting the surgical site requires modifying daily eating habits and oral hygiene practices while the incision margins close:
1. Soft & Cool Diet: Stick strictly to nutrient-dense, room-temperature, or cold soft foods for the first 3 to 5 days. Ideal options include Greek yogurt, fruit smoothies (consumed with a spoon), mashed potatoes, pureed vegetable soups, and scrambled eggs. Avoid hot liquids, spicy seasonings, and acidic citrus juices that irritate sensitive gums.
2. Chewing Precaution: Always chew food on the opposite, non-surgical side of the mouth to avoid direct mechanical pressure or micro-movement on the implant fixture.
3. Gentle Hygiene Protocol: Resume brushing remaining teeth 24 hours post-surgery using a soft-bristle toothbrush, taking care to avoid direct contact with the surgical incision and sutures.
4. Warm Salt-Water Rinses: Beginning on Day 2, rinse gently with warm salt water (half a teaspoon of salt in a glass of warm water) 3 to 4 times daily after meals to cleanse food debris and decontaminate oral tissues without harsh chemicals.
Adhering to these early implant care tips ensures that gingival margins seal firmly around the healing abutment, setting the stage for deep bone integration in the weeks ahead.
Post-Surgical Reassurance at DDC Smiles: Because our clinical team uses 3D CBCT guided surgical stents, flap reflection and tissue trauma are kept to an absolute minimum. Most patients experience only mild, manageable soreness that responds well to routine anti-inflammatory medication, allowing them to resume light desk work within 24 to 48 hours.
Weeks 2 to 6: Soft Tissue Maturation & Sub-Surface Stability
The window between the second and sixth weeks marks a transitional phase in the dental implant healing and treatment process. Externally, the superficial gum tissue appears fully healed, swelling has completely resolved, and daily oral comfort returns to normal. Beneath the surface, however, the biological environment is undergoing a delicate shift: initial mechanical friction (primary stability) is being replaced by new, immature bone remodeling (secondary biological stability).
Protecting the surgical site from micro-movements during these weeks ensures that delicate cellular bridges are not disrupted as bone matrices begin to form.
Key Clinical Milestones During Weeks 2 to 6
1. Suture Removal & Wound Assessment (Days 10-14): Non-resorbable sutures are gently removed during a quick post-op review, allowing the clinician to evaluate mucosal closure and ensure the healing collar remains debris-free.
2. Gingival Collar Remodeling: The soft tissue forms a dense, protective epithelial cuff around the transmucosal healing abutment. This natural barrier shields deeper alveolar structures from oral bacteria and micro-leakage.
3. The “Stability Dip” Phase: Between weeks 3 and 4, the initial mechanical grip of the implant threads slightly diminishes as native bone remodels, while new woven bone is only beginning to deposit. Because total stability reaches its lowest point during this period, avoiding direct chewing on the implant fixture is vital.
Diet Progression & Daily Maintenance
As soft tissues strengthen, daily routines can expand safely with structured precautions:
1. Transitioning to “Fork-Tender” Foods: Gradually reintroduce soft, non-crunchy solids that require minimal mastication effort such as steamed fish, soft pasta, well-cooked lentils, eggs, and soft rice. Continue chewing primarily on the opposite side of the mouth.
2. Foods to Strictly Avoid: Hard nuts, crusty breads, raw carrots, chewy meats, and sticky sweets must remain off the menu, as they can exert lateral leverage on the non-integrated fixture.
3. Oral Hygiene Refinement: You may begin brushing around the adjacent teeth with standard pressure using an ultra-soft toothbrush, followed by alcohol-free antibacterial mouth rinses to maintain gingival health without irritating the margin.
Why Specialized Clinical Monitoring Matters: Feeling completely painless during weeks 2 to 6 can give a false sense that the implant is ready for hard chewing. Regular checkups at a diagnostic-led Dental hospital in Koramangala allow specialists to evaluate soft-tissue adaptation and monitor bone stability using non-invasive percussion checks and low-dose digital imaging, ensuring healing remains on track before the deeper integration phase begins.
Months 2 to 6: Osseointegration
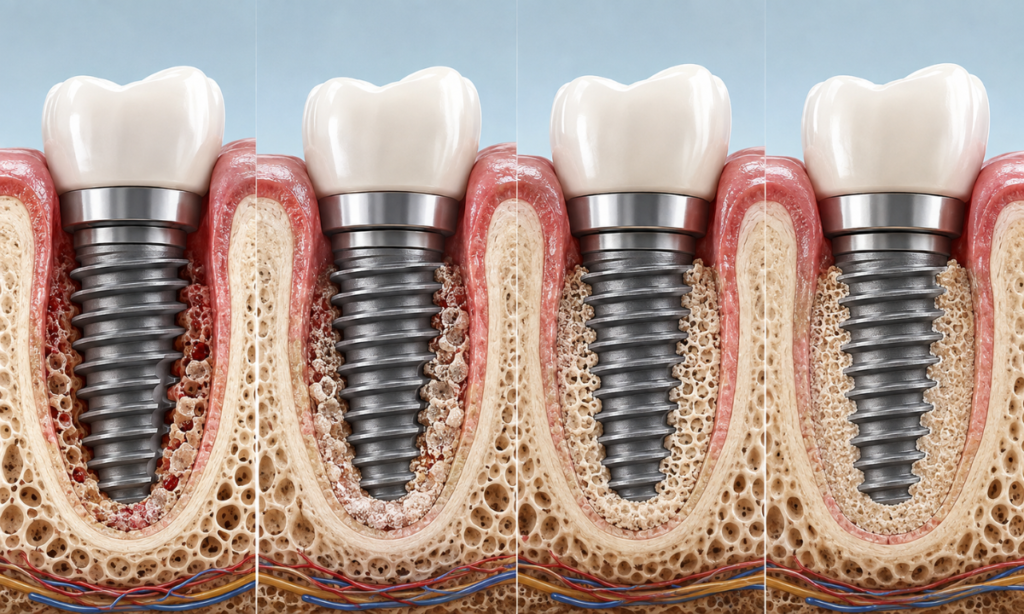
Between the second and sixth months, healing shifts entirely beneath the gingival surface into the microscopic architecture of the alveolar jawbone.
During this critical window, the biological process of osseointegration occurs where living osteoblasts (bone-forming cells) actively migrate, adhere to, and deposit a mineralized calcium phosphate matrix directly onto the micro-porous surface of the titanium or zirconia implant post.
This structural fusion permanently anchors the implant into the skeletal system, transforming the prosthetic fixture into a functional root replica.
The Biological Progression of Bone Fusion (Month by Month)
Bone integration follows a predictable biological cascade as native woven bone matures into dense, load-bearing lamellar bone:
| Timeline and Phase | Microscopic Bone Activity | Mechanical vs. Biological State | Patient Precautions & Clinical Checks
|
|---|---|---|---|
| Month 2 (Weeks 6-8) | Osteoblasts lay down unorganized trabecular (woven) bone along the implant threads; new micro-capillaries establish blood supply. | Secondary biological stability begins surpassing initial mechanical friction. | Resume standard oral hygiene; avoid localized direct impact or heavy pressure. |
| Month 3 (Weeks 9-12) | Mineralization accelerates; woven bone transitions into organized, high-density lamellar bone; structural rigidity increases. | Stable bone-to-implant contact (BIC) achieved in high-density mandible (lower jaw) sites. | Mid-term clinical evaluation and low-radiation digital imaging to assess bone density. |
| Months 4 to 6 | Deep bone remodeling consolidates; dense cortical bone locks the fixture into permanent skeletal alignment. | Full biological integration completed across softer maxilla (upper jaw) or grafted sites. | Diagnostic stability testing (ISQ / resonance frequency analysis) prior to crown impression. |
Key Variables Influencing Bone Density & Integration
The speed and quality of bone fusion vary depending on anatomical location, surgical precision, and systemic physiological health:
| Clinical & Systemic Factor | Favorable Conditions | Compromising Factors | Impact on Structural Stability
|
|---|---|---|---|
| Jawbone Quality & Location | Dense cortical bone (predominant in the lower anterior jaw). | Porous, softer bone structure (common in the posterior upper jaw). | Denser bone integrates faster (around 3 months), while porous bone requires up to 6 months. |
| Pre-Surgical Bone Grafting | Solid native bone height and thick ridge width. | Extensive sinus lifts or guided bone regeneration (GBR) procedures. | Grafted biomaterials require an additional 3 to 6 months to fully turn over into living native bone. |
| Systemic Health & Lifestyle | Controlled glycemic levels, non-smoker, balanced vitamin D3 levels. | Active tobacco use, uncontrolled diabetes, severe osteoporosis. | Nicotine constricts micro-vascular perfusion, significantly delaying osteoblastic apposition. |
What Secures a High Long-Term Success Rate?
When planned with sub-millimeter 3D diagnostics and maintained with proper hygiene, dental implants deliver an outstanding overall implant success rate exceeding 95% to 98% over a lifetime. Achieving this standard relies on:
1. Minimizing Micro-Motion: Keeping the fixture free from direct, off-axis occlusal forces while early bone bridges are forming.
2. 3D Guided Placement Precision: Ensuring optimal three-dimensional angulation and depth relative to surrounding cortical plates using pre-operative CBCT planning.
3. Systemic Healing Support: Maintaining optimal nutrition, adequate hydration, and completely abstaining from smoking during active bone remodeling.
The Diagnostic Advantage at DDC Smiles: Under the maxillofacial radiology expertise of Dr. H. J. Jaikrishna, every implant is planned using high-resolution 3D CBCT scans to map bone trabeculation and density beforehand. By measuring bone volume precisely prior to surgery, our specialists ensure optimal primary stability and predictable, uncomplicated osseointegration.
Beyond Month 6: Abutment Placement, Crown Loading & Long-Term Care
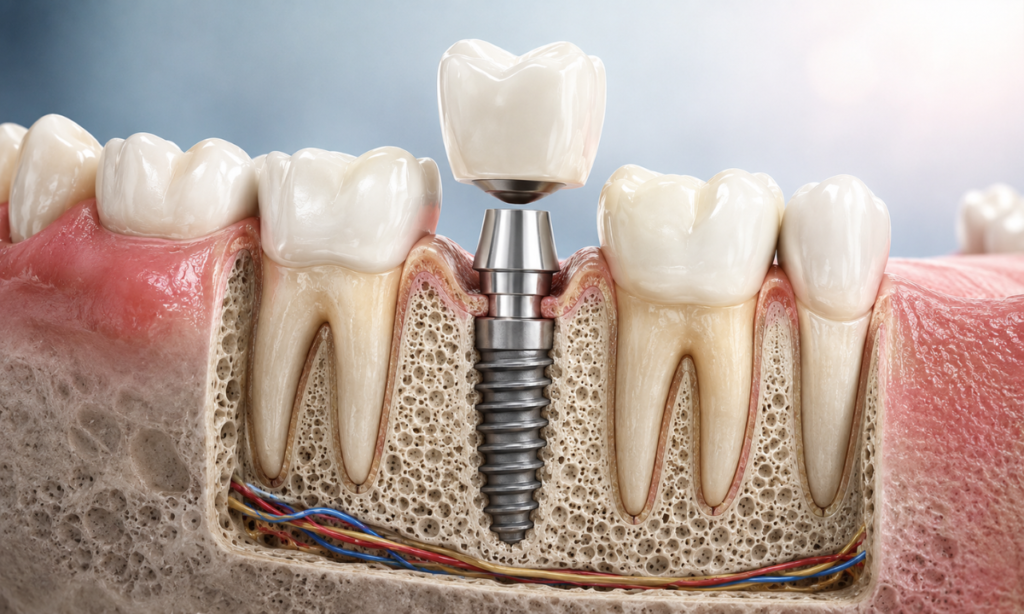
Reaching the six-month milestone marks the transition from surgical healing to functional restoration. Once 3D diagnostic imaging confirms that osseointegration is complete and the implant has securely integrated with the surrounding jawbone, the focus shifts to placing the custom abutment and securing the permanent, lifelike crown.
This final phase restores full chewing capacity, aesthetic balance, and bite alignment.
The Final Restorative Steps: From Fixture to Functional Tooth
The restorative phase transforms the sub-gingival titanium post into a fully functioning tooth through several precise steps:
1. Digital Intraoral Scanning: Rather than relying on messy, uncomfortable traditional impression trays, high-speed 3D optical scanners capture precise digital impressions of the implant site and adjacent teeth in seconds.
2. Custom Abutment Placement: A biocompatible titanium or custom-shaded zirconia connector (the abutment) is secured directly to the implant fixture, extending just above the gumline to support the prosthetic crown.
3. Precision Crown Fabrication & Shading: Using CAD/CAM milling technology, a monolithic zirconia or layered ceramic crown is custom-crafted to replicate the exact anatomy, translucency, and shade of your natural teeth.
4. Occlusal Calibration & Bite Adjustment: The crown is securely torqued into place, and bite articulation is carefully checked to ensure biting forces are evenly distributed along the long axis of the implant.
How to Take Care of Dental Implants After Surgery
While titanium implants and ceramic crowns cannot develop cavities, the surrounding gum tissue and supporting bone remain vulnerable to plaque-induced inflammation, known as peri-implantitis.
Understanding how to take care of dental implants after surgery and maintaining consistent daily hygiene ensures the restoration lasts a lifetime:
1. Interdental Cleaning & Flossing: Use implant-specific nylon-coated interdental brushes or specialized unwaxed floss to clean around the abutment margins without scratching the titanium collar.
2. Water Flosser (Oral Irrigator) Therapy: Directing a pulsating water stream around the implant base decontaminates the gingival sulcus, removing trapped food particles and sub-gingival bio-film.
3. Non-Abrasive Brushing: Brush twice daily with a soft-bristled manual or sonic toothbrush using low-abrasive fluoride toothpaste to prevent micro-scratches on polished ceramic crowns.
4. Nightguards for Teeth Grinders: If you experience nocturnal bruxism (jaw clenching or grinding), wearing a customized nightguard protects the prosthetic crown and underlying bone from excessive lateral force.
Restorative Precision at DDC Smiles: From digital intraoral scanning to CAD/CAM zirconia crown loading, our specialists at our Dental hospital in HSR Layout ensure your final restoration achieves optimal bite alignment, seamless aesthetics, and durable long-term stability.
Why Choose DDC Smiles for Dental Implants?
Achieving a smooth recovery and lifelong implant stability begins long before surgery; it starts with diagnostic precision, 3D anatomical mapping, and specialist-led surgical execution. Established in 2001 and backed by more than 25 years of clinical leadership, DDC Smiles provides a diagnostic-first environment designed to minimize surgical trauma, shorten recovery times, and deliver predictable aesthetic outcomes.
Key Clinical Advantages at DDC Smiles
1. Maxillofacial Radiology Leadership: Guided by Dr. H. J. Jaikrishna (MDS, PGDMLE, FDS RCPS Glasgow) a senior Maxillofacial Radiologist every implant procedure is planned using high-resolution 3D anatomical evaluations to map nerve pathways, sinus cavities, and cortical bone density with sub-millimeter precision.
2. In-House 3D CBCT & Digital Guided Surgery: With on-site Cone Beam Computed Tomography (CBCT), 3D surgical guides are custom-fabricated for pinpoint angulation and depth control. This computer-guided approach reduces surgical duration, minimizes incision size, and significantly reduces post-operative swelling and discomfort.
3. Permanent In-House Multi-Specialty Team: Rather than relying on visiting or rotating consultants, DDC Smiles, a multispeciality dental clinic and implant centre, features a permanent team of MDS specialists across Implantology, Periodontics, and Prosthodontics to provide complete clinical continuity from initial scan to final crown seating.
4. Hospital-Grade Sterilization Standards: Strict infection control protocols utilize multi-tier Class-B fractional vacuum autoclaves, ultrasonic decontamination, and individually sealed surgical cassettes to eliminate any risk of cross-contamination.
Digital Restorative Workflow: High-speed intraoral 3D scanners and CAD/CAM milling technology ensure your final zirconia or ceramic crowns fit comfortably with precise occlusal alignment.
Conclusion
The journey through dental implant recovery is a structured, predictable biological progression. From initial clot stabilization in the first week to deep osseointegration over the subsequent months, each milestone brings you closer to a permanent, functional tooth replacement that looks and feels natural. By understanding what to expect at each stage and adhering to proper post-operative care, you can navigate your healing journey with clarity and confidence.
Schedule Your Dental Implant Consultation at DDC Smiles
Take the first step toward restoring your smile with permanent, computer-guided dental implants. Contact our specialist team to book a comprehensive 3D diagnostic evaluation:
1. Koramangala Branch & CBCT Diagnostic Centre:
6, 7 “Jai Plaza I”, 80 Feet Road, 1st Block, Koramangala, Bengaluru, Karnataka – 560034
Phone: +91 90087 09973 | +91 80-255 29197
2. HSR Layout Branch:
9, Katha No 47/9, Jai Plaza Symphony, 9th Main Road, Sector 6, HSR Layout, Bengaluru, Karnataka – 560102
3. Phone: +91 81055 37633 | +91 80-2572 3661
4. Email: dentaldiagnosticcentre@gmail.com
Website: ddcsmiles.in
Reference:
https://www.pickeringsmilecentre.ca/knowledge-centre/dental-implant-recovery-what-expect-after-surgery/
